Infinite loop wipe transition effect tutorial
Note: I will repeatedly use the colloquial term "GIF" here to refer to any looping animation. I have come to prefer the WEBP format for my animations that I post to Lemmy, but the term GIF has become somewhat of a catch-all for looping animations regardless of the actual file format used.
Introduction
You may have seen GIFs like this that have a fancy "wipe" transition effect:
Example

This transition can serve two purposes:
- Provide a more concrete way for the audience to know where the GIF starts and where it ends. Oftentimes, you may come across a GIF in your feed that is already playing by the time you turn your attention to it. By that point, you might not know if you are right at the beginning of the GIF, or if it is already partway through its loop. If so, the end of the GIF may seem like it is just a hard camera cut in the source material, but still the middle of the GIF. In the right cases, applying this effect gives a point where the user knows that the linear chain of events in the GIF has started
- Simply adding a cool bit of flair to a GIF without detracting from its content
Here, I will walk you through my technique to create this effect. This is probably a beginner-to-intermediate video editing tutorial and assumes that you have a solid understanding of layers and keyframes.
Background
- When the final GIF is played, it will begin playing at the beginning, with no "wipe" effect at all. That effect actually comes in at the end of the GIF. But after looping a couple times, the audience should perceive it as if the "wipe" is actually the beginning of the GIF. As long as the software playing back the GIF (ex. web browser, Lemmy client, photo gallery) can seamlessly loop it without introducing any sort of "stutter" at the end, the loop should be imperceptible
- For this tutorial, I will refer to two different sections of a GIF: the main section and the transition section. The main section is, well... the main part of your GIF. The part that, if you were not applying this fancy effect, would simply be the entirety of your GIF. The transition is the part at the very end of your GIF that we will be focusing on with this tutorial. This is the section that provides the "illusion"
- Ideally, your source material should have several frames both before and after what you want to use for the main section. The best type of source for this effect is something like a single sentence of a full line of dialogue. You can create your GIF focusing on that one sentence, and the several frames surrounding that sentence can be used to create the transition. The worst type of source material is if the camera cuts to/from a different scene after/before the part that you want to create a GIF of. That camera cut ruins the illusion, making this effect rather useless
- For the most part, applying this effect can be an afterthought. You should be able to create your GIF as you usually would had you not been planning to add this fancy transition, and then add the transition as your last step before exporting
- I don't think I've ever read/watched a tutorial on this, so there may be better ways to go about it. This is just the technique that I came up with to mimic this effect that I have seen in GIFs by users that are far more talented than I am
- I will be using Kdenlive for this tutorial, but these steps should be able to be adapted to just about any other video editor
Tutorial
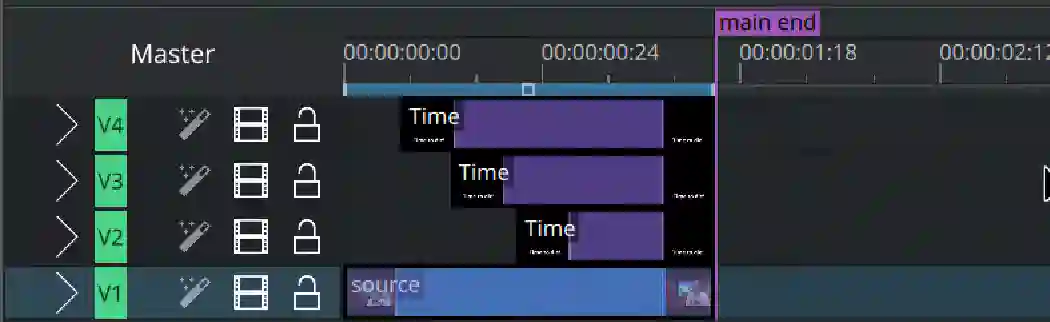
- As I had alluded to above, I typically apply this effect as an afterthought. Just use a video editor to create your project as you usually would (cutting clips, adding fancy text, applying filters, etc.). Here is a screenshot of my example project at this stage. One layer for the source video, and then additional layers for each word of the moving text

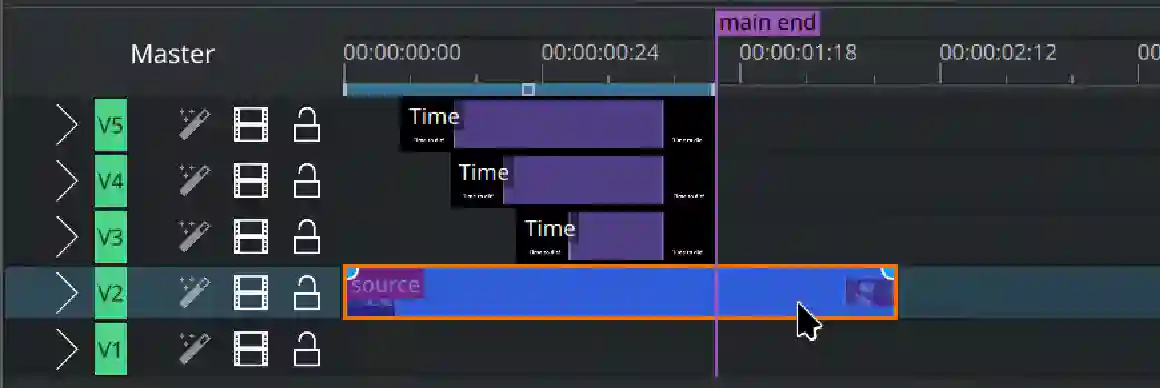
- Extend the end of the clip to where you want the transition to end
- Create a new layer at the very bottom, and then paste a copy of the source clip into that new layer, right up against the end of the extended top source clip. If your project is more complex than mine and has multiple clips for the main section, copy the very first. Extend the beginning of that bottom clip right up to the end of the main section, then cut the end of that clip down to match the end of the top clip. If done correctly, the last frame of the bottom layer should be the frame from the source material that comes directly before the first frame of the top layer
- Add a keyframe on the top clip, right at the end of the main section, then another keyframe right at the end of the clip (which should also be the end of the transition section)
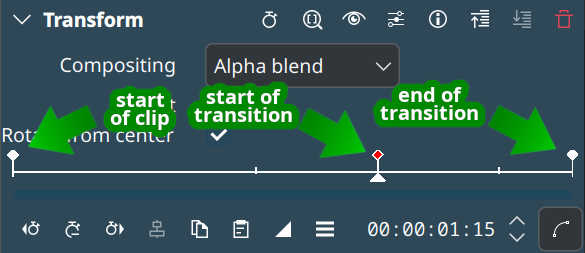
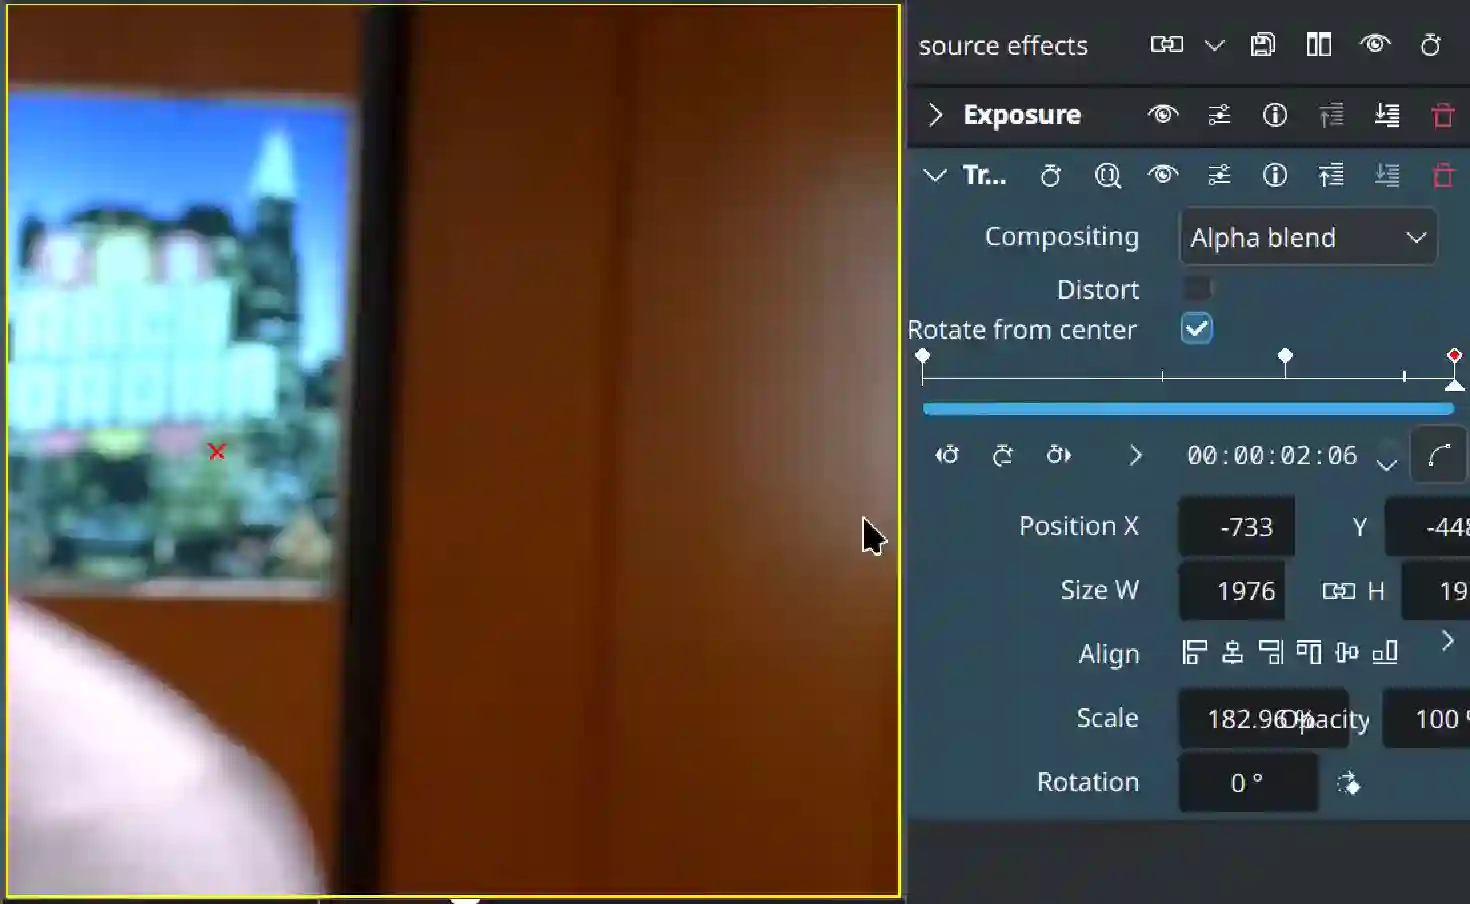
- At the end-of-clip/end-of-transition keyframe created in the previous step, position that clip offscreen. This should create the wipe effect that reveals the layer underneath
- You may also have text that needs to "wipe" along with the top video clip. If so, extend your text layer(s) through to the end of the transition section, then add keyframes to reposition the text just like you did to the video layer in the previous two steps. To make the text move at the same speed as the clip, you may need to use some math to determine the number of pixels that the clip had traveled to get offscreen (subtract the position of the two transition keyframes). Move the text layer that same number of pixels, and the speeds should match
Alternate technique for non-ideal source clips
If your source clip does not have usable excess frames before or after the main section of your GIF, you can still apply this effect in a slightly worse way. Simply take a still shot of the first and/or last frame of the GIF (including any text, filters, etc.) to use in the transition.
- No frames before: take a still of the first frame and use it instead of the "bottom clip" in step three of the tutorial above. This frame should run the entire length of the transition section
- No frames after: take a still of the last frame and use it on the top video layer. Instead of extending the video clip at all as shown in step two above, this frame should run the entire length of the transition section for this layer. Follow steps four and five above to place keyframes on this frame and position it to wipe away to reveal the bottom layer


